

when my husband and i decided to buy a house, we knew building a new home was the best option for us. we like a certain style and certain finishes, and this home was the closest to what we would have picked out had we renovated an older home. it saved us a lot of work (and money!) to have it done our way from the beginning. there were a few things, however, that we didn't like but couldn't change. the fireplace is one of those things. i hated it in the model home, and i hated it in our home. so we picked the cheapest/easiest-to-remove tile at the tile shop and counted down the days until we could demo that baby and turn it into what we really wanted.
when we moved back from monatana the fireplace was at the top of the list for me. it had to be done by christmas!
we love to diy and my husband has a really good understanding and skillset when it comes to projects at home, so this might not be the "professional" way, but here's what worked for us:


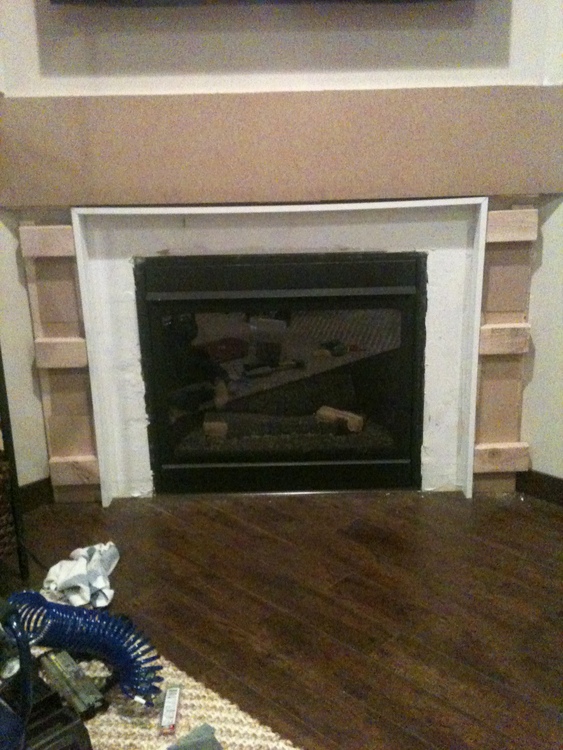
he was very careful not to damage the wall or molding that wouldn't be covered by the new finishes, and we were lucky that it came apart so easily. the previous tile was held on by little dabs of mortar and they popped off pretty easy. we made sure to use a blanket to protect our wood floors from falling tile.
next we drew up the plan (i'm not sure why i thought we should demo before we had a set plan!). i told him what i wanted and we looked through image after image of fireplaces we liked, and then he sketched up the final look.

we knew we wanted the woodwork to be built it out from the wall to give it some depth and seem like a real fireplace, not just wood on a wall. he used scrap wood to build a frame so the finished woodwork would stick out 2.5 inches.

he covered the frame with hardboard so we would have a smooth finish in the end. he used glue as much as possible and when nails were needed used them sparingly in places they would be hidden.

next came the trim work. we used white mdf for this, which saved so much time when i painted the finished product. again, these were glued and he used just a few nails that could be easily filled.

from this point everything is up to personal taste. i really wanted marble subway tile and we found just what we were looking for at lowes (i couldn't find a link online, but it's similar to this). cove and crown moldings were used to build up the mantle, and the mantle was made using select pine, cut to be eight inches deep. once everything was glued and nailed in place i caulked all the seams so they look flawless (do your best, caulk the rest!) and then painted it using sherwin williams ProClassic paint in marshmallow. (i have used this paint for a lot of projects and it is great. it's more expensive, but the finished look is worth it. no brush strokes, and it's as hard as enamel.)
this project came together pretty easily because my husband is a perfectionist when it comes to measuring and cutting angles. he understands how moulding and corners fit together, and what degree of angle will give him the right fit. i do not. so if this project was up to me it would be a mess! if you are tackling anything that deals with angles and corners, make sure you do your math and have a tool that can cut perfect angles for you. most of this was cut by hand using this tool.

we absolutely love how it turned out, it has changed the look and feel of our living space. it's so much more modern, and i LOVE the sparkle from the marble. every room needs a little sparkle, right? :)

i am a lucky girl to have a husband that is not only handy, but also willing to put up with my "just shave off a quarter-inch and it will be perfect!" anal-retentive ways, as well as my "hey! let's do another project!" bit that happens a few times a month. he told me i'm the his toughest project manager, and that's probably true :)
ps i took these photos after i decorated for christmas, i don't normally have gold balls on my vases :)
pps sneak peek of our diy ottoman in the fireplace glass!
I am in love with your new fireplace! It looks beautiful.
ReplyDelete-Christy
thank you christy!
Deletexo
You truly have an eye for design! It looks so beautiful now!
ReplyDeletethanks so much!
Deletexo
This is kind of a random comment but what is the name of the font you used for your header. I found your blog through Nicole's classes blog and loved your project there (with the same type I think). It would be perfect for a project I'm working on. Thanks so much!
ReplyDeletethe font is called jacques and gilles, here's a link:
Deletehttp://www.myfonts.com/fonts/emily-lime/jacques-and-gilles/
you can also find it on etsy:
http://www.etsy.com/listing/97171195/jacques-gilles-font
it's one of my favorites!
xo
This comment has been removed by the author.
ReplyDeleteBeautiful! We have a builder grade fireplace too & looking for upgrade. Do you have the dimensions of your mantel & width of your tile surround? Thx!
ReplyDeleteBeautiful!! can I ask where you got the tile?
ReplyDeleteThank you!!
I absolutely love your fireplace! What a transformation! I am planning to do something similar with mine. Would you mind sharing your measurements for the width of the tiled area as well as the width of the mantel legs? Thank you.
ReplyDeleteThis comment has been removed by the author.
ReplyDeleteDo you remember the color of the grout that you used? Thanks! It looks amazing!
ReplyDeleteHow did you set up your cable box and such?
ReplyDelete